Thursday, April 21, 2016

Inexpensive Baby Gift- Pocket Bib Pattern and Tutorial to Sew for an Infant or Toddler with a Bonus Pattern for a Matching Doll Bib! Easy to make!


Handmade gifts are a tradition in our family. My grandmother knitted, crocheted and sewed things for my mom, me and my kids, my mom sews and knits for me, my kids and now my grandkids. There’s something very special about using an item that was made with so much love, especially when it’s from your great-grandma or your grandma! For each baby I usually make a couple of flannel receiving blankets. I always use plaid flannel shirting, it looks the same on both sides and is so very soft. (Our family isn’t really into baby fabrics. We all like fabrics that can be used well into childhood.) I crochet a simple edge onto one of them. I also sew burp clothes and bibs. When my daughter became pregnant 4 years ago, I went into full grandma mode. I started sewing up a storm. I designed this pattern because I just couldn't find a bib pattern that I really liked. The other patterns made bibs that were either too small, too big, no pocket or didn’t provide enough coverage. so I designed my own. I took me 3 years and sewing dozens of bib to develop this pattern. Everyone who has used it calls it the perfect bib! This is a very easy pattern to make and feel free to adjust it to suit your baby or grand baby. This bib can be made without the pocket as well. There are some bibs that have different sizes. We’ve found that this size works from infant through ages 3-4. For an infant it gives total coverage which is good since they make the biggest messes. 

These make a wonderful inexpensive baby gift. The pattern is $2.99 and the fabric ends up being around $3.00 for each bib. At that price you can make a few and give a handmade gift that is unique and made with love. 

Pattern 
Print the bib pattern out. Make sure when printing not to click Fit to Page! You want it to print at 100% size to be correct. There will be 3 pages- A- Bib Top, B- bottom and C-pocket. The Doll bib pattern is on the last page. If you buy 3/4 of a yard of fabric you won’t need to print the C Pocket pattern page.
Cut the extra paper off of the bottom of the Top-A pattern piece and lining up the bottom line with the top line of piece B- Bottom. Tape the 2 parts together to make the full bib pattern.

Fabrics
Prewash and dry before cutting and sewing the bibs!
I like to use a cotton print for the front, a layer of white cotton
flannel for the lining and a layer of a colored or print flannel for the back. I like a flannel backing because it’s soft against their skin. You can easily use 2 cotton prints one on the front and one for the back. I add a layer of cotton flannel in-between my front and back fabrics. It adds some absorbency to the bib. You can skip that if you want but I highly recommend it! You can also use a waterproof layer in the middle if you want to. Do NOT use cotton gauze in the middle. Even after pre-washing the cotton gauze in hot water and drying in a hot dryer, it continues to shrink wash after wash and distorts and ruins the bib! 

Amount of Fabric
For 3 bibs with pockets buy:                                         For 3 bibs without pockets buy: 
3/4 of a yard of front fabric                                            1/2 of a yard of front fabric 
1/2 yard of lining flannel                                                1/2 yard of lining flannel
1/2 yard of backing fabric                                              1/2 yard of backing fabric

3/4 yard (27”) will make 3 bib fronts with pockets.
1/2 a yard will make 3 Bib fronts without pockets OR 3 Bib Liners OR 3 Bib Backs- You don’t cut pockets out of these just the Bibs.

If you want to use scraps here are the measurements of the full bib cut out.
The bib front with a pocket needs a piece of fabric 12” wide by 26 3/4” long
The bib front without a pocket, the bib back and the lining EACH need a piece of fabric 12” wide by 15 3/4 long.


Using coupons at Joann’s or looking for sales I usually can make 3 bibs for $3.00 each. Less if there’s a great sale! 

Notions  
  • Thread to match fabric for inside sewing and topstitching.
  • Pins to pin the layers together before sewing. (If I am using flannel for the lining and the backing, I don't pin! The fabrics "stick together" enough to not need pins. 
  • A chopstick or knitting needle to use to smooth seams when turning bib right side out.
  • An Iron- to press bib flat before top stitching.
The pattern includes step by step photo illustrated instructions that are very detailed with tips on things I do to make it easier. I also included 2 different sized doll bib patterns so your child and their favorite doll can match. 


It is an easy sewing project that makes a great gift! 


There are 2 of each bib in this photo below. That why it looks like there is solid fabric under the turned down corner! 


Wednesday, February 10, 2016

Perfect, Chewy Maple Cookies with Maple Glaze


My husband has been working in Canada for the last couple of weeks and has been bringing me home all sorts of maple treats. I've been in such a maple mood that I decided to try my hand at some maple cookies.

If you like crispy cookies, these are not for you! These are chewy, moist cookies that make your mouth sing!  They have just the perfect hint of maple from real maple syrup. I'm not talking about pancake syrup, that has the same amount of real maple sugar in it that an oak tree has. I'm talking about the real kind that comes from boiling the spring maple sap down into it's golden deliciousness. 

If you like more maple flavor you can add in some maple extract! You can decide how much maple you'd like!


INGREDIENTS 
COOKIE DOUGH
  • 1 cup butter (2 sticks)
  • 2 cups packed brown sugar
  • 2 eggs
  • 1 cup real maple syrup
  • 1-2 tsp maple extract (optional) This is for more maple flavor- if you prefer.
  • 4 cups of all purpose flour
  • 4 tsp baking powder
  • 1 tsp salt

GLAZE
  • 1 1/2 cups of powdered sugar
  • 3 TBS melted butter
  • 1/3 cup real maple syrup

INSTRUCTIONS
COOKIES
  1. Preheat oven to 375°
  2. Grease cookie sheets or line with parchment
  3. In a large mixing bowl, cream together the butter and sugar until light and fluffy.
  4. Beat in the eggs, maple syrup and (optional- maple extract) until fluffy.
  5. Combine the flour, salt and baking powder and with mixer off, add to the creamed ingredients. Turn mixer on low and mix until just combined.
  6. Drop by rounded tablespoonfuls onto the greased or lined cookie sheets.
  7. Bake in the 375° oven for 10-12 minutes until cookies are lightly golden browned. the tops will be cracked.
  8. Remove from pans to cool.

GLAZE
  1. Mix 1 1/2 cups of powdered sugar, 3 TBS melted butter and 1/3 cup real maple syrup together until well blended. If the glaze is too thick you can add a couple of drops more of maple syrup or water to thin out.


PUTTING THEM TOGETHER
  1. When cookies are completely cooled, drizzle glaze over the tops. I use the whisk or fork that I mix the glaze with. I dip into the glaze and then go back and forth over the cookies.

These freeze really well if you don't eat them all first!


Tuesday, February 9, 2016

Peanut Butter Blossom or Kiss Cookies


These cookies are chewy and peanut buttery and delicious. You can use a Hershey's chocolate kiss in the middle or a Brach's Chocolate Stars. I like the stars because they come in milk or DARK chocolate and as far as I'm concerned, the darker the better when it comes to chocolate plus they look so pretty. We love these not only at  Christmas but any time of the year.
Ingredients
• 48 Hersheys' Kisses or Brach's Chocolate Stars
• 1/2 cup butter
• 3/4 cup Creamy Peanut Butter
• 1 cup packed light brown sugar
• 1 egg
• 2 tablespoons milk
• 1 teaspoon vanilla extract
• 1-3/4 cups all-purpose flour
• 1 teaspoon baking soda
• 1/2 teaspoon salt
• Granulated sugar to roll dough balls into before baking
Directions
  1. Preheat oven to 375 degrees 
  2. Beat butter and peanut butter in large bowl until well blended. 
  3. Add 1/3 cup granulated sugar and brown sugar; beat until fluffy. 
  4. Add egg, milk and vanilla; beat well. 
  5. Stir together flour, baking soda and salt; gradually beat into peanut butter mixture.
  6. Shape dough into 1-inch balls. Roll in granulated sugar and place on ungreased cookie sheet.  Do NOT put the chocolate on the cookie yet.
  7. Bake 8 to 10 minutes or until lightly browned. 
  8. Remove from oven and immediately press a chocolate into center of each cookie, the cookie will crack around edges. 
  9. Remove from cookie sheet to wire rack. 
  10. Cool completely. 
Makes About 4 dozen cookies

Sunday, February 7, 2016

DIY- Life Hack- Quickly and Easily Clean your Garage Floor with Snow


DIY- The Fastest and Easiest Way to Clean a Dirty, Winter Garage Floor from Factwoman Blog

I don't know about you but my garage floor gets so dirty during the winter. The dried dirt and crud from the roads just covers it. 

During the summer, I use the hose to rinse it all out but, during the winter, I don't want a skating rink in my garage. I've used this method to clean my garage floors during the winter for years and thought I would share it with you. 

How do I do it- I use snow!!!! Think of a snowcone. A snowcone just sucks up that syrup and that's what snow does to all the dirt and dirty water on the garage floor.  Plus snow crystals are slightly abrasive so it scrubs off that dried on dirt as you sweep it all out the door.


Here's the before!  Obviously my garage floor needs to be repainted this spring but you can see how the dried on dirt is all over where the car parks. 

DIY- The Fastest and Easiest Way to Clean a Dirty, Winter Garage Floor from Factwoman Blog

Here's how to do it:

First:  Sprinkle fresh clean snow all over the floor with a shovel making sure to cover any dirty spots.  Second: Let it sit for 5-10 mins.
DIY- The Fastest and Easiest Way to Clean a Dirty, Winter Garage Floor from Factwoman Blog
Third: Using a wide broom, sweep the snow out of the garage. Usually the dried dirt comes right up with the snow, but occasionally you might have to move the snow back and forth over a stubborn spot to get it up.
DIY- The Fastest and Easiest Way to Clean a Dirty, Winter Garage Floor from Factwoman BlogDIY- The Fastest and Easiest Way to Clean a Dirty, Winter Garage Floor from Factwoman Blog
The snow just sucks up the dirt and any water on the floor. It's like magic!!!

All the dirt is gone! Boy, do I ever need to paint this floor!

DIY- The Fastest and Easiest Way to Clean a Dirty, Winter Garage Floor from Factwoman BlogDIY- The Fastest and Easiest Way to Clean a Dirty, Winter Garage Floor from Factwoman Blog

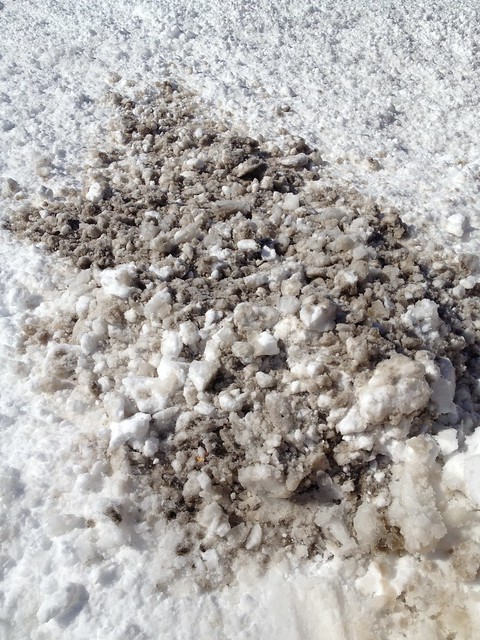
Here you can see how the snow absorbed the dirt and muck?!!  Sweep all the dirty snow into a pile and  shovel it off to the side so it doesn't get tracked back into the garage.  You now have a clean garage floor in minutes!
DIY- The Fastest and Easiest Way to Clean a Dirty, Winter Garage Floor from Factwoman BlogDIY- The Fastest and Easiest Way to Clean a Dirty, Winter Garage Floor from Factwoman Blog 


I hope you find this method as useful as I do!

Sunday, December 20, 2015

Brandy Snaps with Cinnamon Eggnog Cream or Brandy Cream


I love brandy snaps.  They are light lacy crisp tubes that you can fill, leave unfilled and dip one end into melted chocolate or leave plain. They take a bit of practice but after one or two you'll find them very easy to make!

You really have to find some Golden syrup to make this recipe. Karo just doesn't work as well. I get mine at Cost Plus but Amazon has it as well.

This recipe makes 24 cookies.

  • 1 cup all-purpose flour
  • 1 teaspoon ground ginger
  • 2/3 cup sugar
  • 10 tablespoons unsalted butter
  • 1/2 cup Lyle’s Golden Syrup
  • 1/2 tsp lemon juice
  • Preheat oven to 350º 
  • Line 2 cookie sheets with parchment and then grease the handle of a wooden spoon well and set aside. 
  • Into a small bowl stir together the flour and the dried, ground ginger
  • Add the butter, sugar and golden syrup to a medium saucepan over medium-low heat and heat until the sugar is completely dissolved.  Don't stir too much or allow the mixture to boil or the sugar can crystalize.  This will take about 10-15 minutes
  • Once the sugar is dissolved, remove from the heat and stir in the flour and the lemon juice. 
  • Using a tablespoon, scoop 1 TBS  onto the cookie sheet.  Place 3-4 scoops 4" apart onto a cookie sheet. 
  • Bake for 10-12 minutes until cookies are golden brown, spread out and bubbling. 
  • Remove from oven and let sit for 2-3 minutes. The cookie needs to be just firm enough to remove, but pliable enough to shape. I use a thin knife or very thin spatula to carefully peel up an edge. If the edge doesn't stretch out it's time to shape!   
  • Roll the cookie around the greased spoon handle and set on a cooling rack. 
  • You have to move fast to get them all done before they harden up too much. 
Let the cookies cool completely before dipping one end into melted chocolate or filling with the Brandy cream or the Eggnog cream. 

Brandy Cream
1 1/2 cups whipping cream
2 TBS Brandy
1/3 cup sugar
Combine cream, brandy and sugar and whip until stiff peaks. 

Cinnamon Eggnog Cream
1 1/2 cups of whipping cream
2 TBS Brandy
3 TBS Eggnog
1/2 tsp of cinnamon
1/3 cup sugar
Combine all the ingredients and whip to stiff peaks. 


Tuesday, December 1, 2015

Homemade Plain or Peppermint Marshmallows and Cocoa Mix for Teacher Gifts or Neighbors


Here is an easy gift to make for teachers, neighbors or friends. Marshmallows and cocoa mix. If you've never made marshmallows, I hate to be the one to tell you that they are super simple and very impressive. I love making peppermint marshmallows to put in cocoa but you can make plain if you prefer. You can also try rolling them in toasted coconut or even chopped nuts to eat them like candy.

Homemade Marshmallows:

* 3 packages unflavored gelatin
* 2 cups granulated sugar
* 1/2 cup light corn syrup
* 1/4 teaspoon kosher salt
* 1 tablespoon pure vanilla extract
* Confectioners' sugar, for dusting

Sprinkle powdered sugar into 2 8"x8" pans or one 9"x13" until bottom is completely coated.
Pour the gelatin and 1/2 cup of cold water into the bowl of an electric mixer fitted with your whisk attachment and allow this mixture to sit while you make the syrup.

In a large saucepan, preferably one that has a spout, combine the sugar, corn syrup, salt, and 1/2 cup water in a small saucepan and cook over medium heat until the sugar dissolves. Place the lid on the pan for 1 minute to wash down the sides of the pan. Raise the heat to high and cook until the syrup reaches 240 degrees F on a candy thermometer. If you live at higher altitudes, reduce the final temp by 2 degrees for every 1000 feet in altitude. I live at 6000 feet so I only cook my mixture to 228 degrees. Remove from the heat.

Turn the mixer onto low speed, while mixer is going, slowly pour the sugar syrup into the dissolved gelatin. The gelatin will be all chunky when you turn on the mixer. Once all of the syrup is poured in turn the mixer up to high speed and whip until the mixture is very thick, about 15 minutes. Add the vanilla and mix thoroughly.


Pour the marshmallow batter into the prepared pans and smooth the top of the mixture with damp hands. Sprinkle with powdered sugar or whatever topping you are using.

For the peppermint, I removed half the marshmallows for the plain pan and then stirred in 2 drops of red food coloring and 1/2 tsp of peppermint flavoring into the remaining half. After placing this into the second pan I sprinkled crushed peppermints over the top.

Allow to dry uncovered at room temperature overnight.

Remove the marshmallows from the pan and cut into squares. I dip a knife into very hot water before each cut then roll each strip in powdered sugar before cutting into squares. Roll the sides of each square carefully in confectioners' sugar.
 

Once they have dried for a few hours and aren't sticky, they  can be bagged up for gifts or stored in a  sealed container or sealed baggies.

Creamy Cocoa Mix
This makes 20 cups of mix or about 60 servings. I make a big batch at the beginning or the winter and we use it all season. 

  • 13 cups dry milk powder
  • 6 1/2 cups sifted confectioners' sugar
  • 2 1/2 cups unsweetened cocoa powder
  • 2 1/2 cups powdered non-dairy creamer (1- 15oz jar of powdered creamer) 
Sift together all these ingredients into a large bowl.
For extra chocolaty goodness I  add-
  • 2- 12 oz package of mini chocolate chips 
Stir to combine the scoop into jars for gifts or store sealed in a container for storage.

Variations- You can use flavored creamer if you want flavored cocoa or try adding some cayenne pepper to the mix for a bit of spicy heat.

To use this cocoa mix; Scoop 1/3 cup of mixture into mug and add boiling water. Stir and enjoy.

Alton Brown has a Recipe for Cocoa mix that I haven't tried just because I love the creaminess of my recipe but for those who don't want to use powdered creamer here is his recipe.
  • 2 cups powdered sugar
  • 1 cup cocoa (Dutch-process preferred)
  • 2 1/2 cups powdered milk
  • 1 teaspoon salt
  • 2 teaspoons cornstarch


Mix all ingredients together and store in airtight container.

Monday, November 9, 2015

Fluffy No Bake Peanut Butter Pie with a Chocolate lined crust!

Fluffy No Bake Peanut Butter Pie

Fluffy No Bake Peanut Butter Pie from fact Womand and Buttercream Lane


We love to go to a very small town cafe about a half an hour away for their pan fried chicken, cooked to order, and their homemade pies. 

The Castle Cafe always has a killer banana cream pie but every few months the chef will get in a mood to make a Chocolate Peanut Butter Pie that is one of the best things I've ever had and I'm not even a big peanut butter person. Note the "only every few months" part of that- it's not nearly often enough so, I had to play with some recipes to come up with one that tastes just like his!!! We all agree that this is a perfect copy!


One of the secrets to his great pies is his chocolate coated graham cracker crusts. He uses it for his Banana Cream Pie and his Peanut Butter Pie. Brilliant! The crust never get's soggy!!I hope you enjoy this pie as much as we do!


For a Printable Version of this recipe- Click Here! 

Ingredients

Pie Crust- Makes one 9" pie crust- You can also just buy one!!! 

  • 1 package from a box of graham crackers- about 10 sheets of crackers
  • 1/3 cup of sugar
  • 1/3 cup of melted butter
  • 3/4 of a cup of chocolate chips

Peanut Butter Filling

  • 1 1/2  8oz packages of low fat cream cheese at room temperature(12 oz)
  • 1 1/2 cups of creamy peanut butter- store bought not the fresh kind. I like Jif
  • 3 TBS of water or milk
  • 1 1/2  cup of powdered sugar- divided into 1 cup and 1/2 cup
  • 1 1/2 cups of heavy whipping cream
  • 1/2 cup of chocolate chips- Optional- you can mix some into the filling or you can just top the pie with some or both. 

Topping

  • 1/2 cup whipping cream
  • 1/4 cup powdered sugar
  • 1/2 cup of mini chocolate chips- Optional
Peanut Butter Pie from Fact Woman & Buttercream Lane

Instructions 

Pie Crust

  1. Preheat your oven to 375º
  2. While the crackers are still wrapped, press of the sides, top and bottom to start to break them up. 
  3. Place the crackers into a food processor. You can also put everything into a large zip lock bag and crush and mix the ingredients in the bag. 
  4. Add the sugar
  5. Pulse until the crackers are a fine crumb
  6. Pour the melted butter over the crumbs and pulse until all combined. 
  7. Press the crumbs into the bottom of a 9" pie plate. I use a measuring cup to press it in nice and tightly. 
  8. Bake for 7 minutes
  9. As soon as you take the crust out of the oven, sprinkle the chocolate chips over the bottom of the crust. 
  10. Let it sit for 5 minutes until the chocolate chips are melted. 
  11. With the back of a spoon, spread the melted chocolate over the bottom and up the sides of the crust. 
  12. Place in the refrigerator until cool 

Peanut Butter Filling

  1. In a  mixing bowl, beat the whipped cream with 1/2 cup of the powdered sugar until it forms stiff peaks. That means when the beaters are pulled up out of the whipped cream, the points stand up straight. 
  2. In another mixing bowl, place your 12 oz of softened cream cheese, the 1 1/2 cups of peanut butter, 1 cup of powdered sugar and 3 TBS of water. Beat until well combined and slightly fluffy. 

  3. Take 1/3 of the whipped cream and stir it into the peanut butter mixture to lighten it. 
  4. Take the remaining whipped cream and fold it into the peanut butter mixture and fold until all combined. 
  5. Spoon the peanut butter filling into the chilled crust and place in the fridge for at least 2 hours. 

Topping:

  1. In a  mixing bowl, beat the whipped cream with 1/2 cup of the powdered sugar until it forms stiff peaks. That means when the beaters are pulled up out of the whipped cream, the points stand up straight. 
  2. Spread the whipped cream over the top of the pie and sprinkle on the  mini chocolate chips. 
  Note: You can beat all 2 cups of whipped cream and the 3/4 cup of powdered sugar together- just remember to pull out a quarter of it to top the pie with before mixing the whipped cream into the peanut butter mixture. It's up to you! I tend to forget the pull out the topping so I beat the cream in separate batches! 
Peanut Butter Pie from Fact Woman & Buttercream Lane

Thursday, October 15, 2015

Cinnamon Spiced Pumpkin Whoopie Pies with Maple Cinnamon Mascarpone Filling

There's something about this time of year that makes me long for warm, cozy, down home foods and pumpkin to me is one of these foods.
Cinnamon Spiced Pumpkin Whoopie Pies with Maple Cinnamon Mascarpone Filling by Fact Woman and Buttercream Lane Blogs
I was feeling like some fall food so jumped onto Pinterest and found lots of delicious pumpkin recipes. When I saw a couple of recipes for pumpkin whoopie pies, I knew I found what i wanted to make/eat!  The problem I ran into was the recipes either used vegetable oil or a cake mix or both and I didn't want to go there. If I'm going to eat fat, it's going to be butter. Butter just tastes better and makes anything it's in or on taste better too and if I'm going to bake, I want to do it from scratch. It only takes about 5 minutes longer to measure some ingredients and the final result just tastes so much  better..

After reading through different recipes for pumpkin whoopies, I found a few that sounded kind of good, but not quite right. I combined the best of those recipes with a recipe I have for a soft molasses cookies and the Libby Pumpkin Pie recipe and came up with this one. It's a perfect spiced pumpkin cake like cookie with a creamy, buttery, slightly maple flavored filling. I served it to company, family company so they'd be honest, and they were a hit. I hope you enjoy them as much as we all did.

Pumpkin Spiced Whoopie Pies with Maple Mascarpone Filling from Fact Woman

Spiced Pumpkin Whoopie Pies with Maple Cinnamon Mascarpone Filling
Click here for a Printable version of this recipe.

Whoopie Pies
3 cups all purpose flour
1 TBS cinnamon
1 ½ tsp ground ginger
1 tsp baking powder
1 tsp baking soda
1 tsp salt
½ tsp ground nutmeg
¼ tsp ground cloves

1 cup softened butter
1 1/2 cup brown sugar
2 eggs
3 TBS of molasses
1-15oz can of Libby's Pumpkin chilled- I just throw the can in the fridge for a few hours.(this chills up the dough so you can scoop and bake right away. If you don't want to chill the pumpkin, then chill the finished dough for a couple of hours before scooping it to bake.
1 tsp vanilla

Maple Cinnamon Filling
4 cups powdered sugar
8 oz of mascarpone cheese room temperature
1 tsp ground cinnamon
1 stick of butter softened
3 TBS of Maple Syrup or (¼ cup of Maple Sugar plus 3 TBS milk)

The Whoopie part:
  1. Preheat oven to 350° F. Line baking sheets with parchment paper
  2. In a small bowl whisk together the dry ingredients- flour, spices, baking powder, baking soda, salt
  3. In a large mixing bowl, cream together the butter, sugars until combined and fluffy. Add the eggs one at a time and beat to combine. Add pumpkin and vanilla and beat until combined.
  4. Add in the dry ingredients and mix just until combined. Do not over beat.
  5. Using a small cookie scoop or a tablespoon, drop batter onto the parchment lined sheets about 1 inch apart.
  6. Bake for 10-12 minutes making sure that the cookies are cooked through. They will start to crack on the top- it’s part of their charm!  I used a toothpick inserted in to the center to make sure they were done.
  7. Slide parchment off of sheets and onto counter to cool.

Filling
  1. Beat the butter and marscapone cheese until fluffy and smooth- this will take  3-5 minutes. Add  the cinnamon and half the powdered sugar then the maple syrup (or the maple sugar and milk) and the vanilla. Beat until combined. Then continue adding the rest of the powdered sugar until it is thick enough to hold it's shape well.

Assembly
Match up the cookies into sets of 2 similar size and shape and turn one over.  Spoon or pipe the filling onto the upside down cookies covering the entire surface. I spoon all the filling into a quart size zip lock bag and cut one corner off , then all I have to do it squeeze it out to pipe it.
Place the other cookie on top of the filling and press down slightly to get the filling all the way out to the edge. Repeat for each whoopie pie. 

Storage 
Please store these in the refrigerator. You can store these for up to a week in the refrigerator. Take out and let sit at room temperature for about 15-20 mins before serving to soften up or just eat them cold.
Pumpkin Spiced Whoopie Pies with Maple Mascarpone Filling from Fact Woman and Buttercream Lane blogs

Friday, September 18, 2015

How to Make Pumpkins from Sweaters- A Tutorial on Sweater Pumpkins

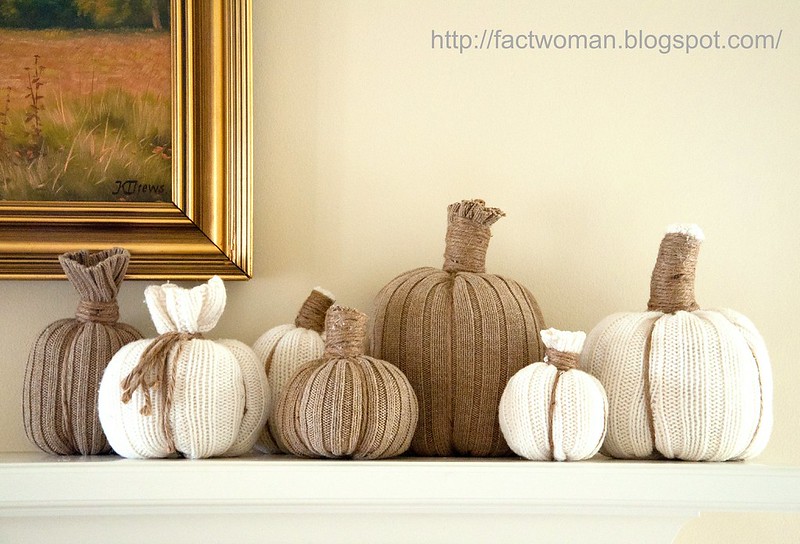
 How to make Darling Sweater Pumpkins
    Here's one to pin!
 

I've been spending some time on Pinterest, it's dangerous. I usually set a timer so I don't get lost there for hours browsing all of the amazing ideas. I was looking for some fall decor ideas and found lots of pictures of these darling pumpkins made from sweaters. I couldn't resist making a few. A quick trip to the Salvation Army store and Hobby Lobby and I was set. I paid $4.10 for 3 sweaters, $1.99 for the stuffing and $3.99 for the twine.

I learned a few things along the way though so here are step by step instructions on how to make them with my tips I learned the hard way through trial and error.

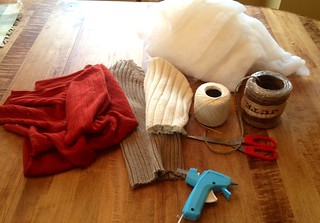
Here's what you'll need:

    Pullover Sweaters- (XL Men's sweaters give you the most material to work with)- I found the heavier knits are more forgiving in terms of not showing lumps and bumps from the stuffing as easily. See orange pumpkin at botto
m of page!
    Stuffing: I used a bag of loose poly-fill stuffing and also some old quilt batting. I also used the scraps of the sweaters that I wasn't using for pumpkins as stuffing.
    Twine, string, dental floss, or even a heavy elastic band to close up the bottom.
    Natural Jute 3 ply twine. I used this kind.
    Sissors
    Glue Gun

Steps:

  • Find the parts of the sweater you'd like to use. The sleeves are really easy and you can get one larger and one small pumpkin from each sleeve, if you are careful. You can use the front and back as well. I cut a square from the front and a square from the back and sewed that square into a tube with my sewing machine. You can also use a glue gun. Fold the square in half, right sides together and run a line of glue down the edge to seal them together. 

  • Take the Jute and measure out 5 pieces that are about 2 to 3 times the length of the piece of sweater you are using.  Tie one end of these 5 pieces together in a knot, to hold them together.
DSC_8579.jpg


  • Turn the piece of sweater inside out so the seams are facing out.


  • Thread the pieces of Jute through the tube with the knot coming out what will be the bottom end of the pumpkin (the wider end).

  • DSC_8581.jpg


  • Take your twine or elastic band and tie the bottom of the tube very tightly. The Jute will be coming out of the center. I tie a knot then wrap the twine around then tie another knot.

  • DSC_8583.jpg

    DSC_8587.jpg


  • Turn the tube right side out.

  • DSC_8588.jpg


  • Time to stuff!!!  As you stuff, you have to pull the knot up through the center to the height you will want the pumpkin to be, you'll see why in a minute. Stuff the pumpkin around the outside of the Jute. Here you can see I used some of the stuffing and some of the sweater scraps. I kept the stuffing on the outside and the sweater scraps on the inside, so it was smooth and un-lumpy.

  • DSC_8590.jpg


  • Once it's stuffed as much as you want, it's time to close up the top. Here's the SECRET!! You have to have the knot come up through where you tie it at the top. I grabbed the top with the knot above my hand then pulled the bottom strings to get the knot exactly where I wanted it to be deep at the base of the neck.

  • DSC_8593.jpg

    DSC_8591.jpg


  • The knot is the key to having it look like a pumpkin! The first few ones I made I didn't have the knot above where I was tying the neck and the pumpkins didn't look like a pumpkin. See the difference? The advantage of a tutorial- I make the mistakes and figure it out so you don't have to!!!!

  • Untitled


  • While holding the neck under the knot pull the ends so it's nice and tight.

  • DSC_8613.jpg


  • Take one of the jute strands and come up the side and wrap it around the neck. I threaded the end under the jute coming up and pull it tight to anchor. Pull it tight so that it pulls the side in a bit and pulls the knot down.

  • DSC_8595.jpg

    DSC_8596.jpg


  • Repeat with each of the 5 jute strands.

  • DSC_8616.jpg

    DSC_8622.jpg


  • Put a dot of glue where each string crosses itself.

  • DSC_8624.jpg


  • Begin to wrap the jute strands around the neck.  On some I just tied them into a knot and left the ends hanging down. On some I took the 5 pieces, lined them up and used them to wrap the stem all the way up to the top.

  • DSC_8623.jpg


  • Once you've got the ends where you want them glue into place and trim the ends.

  • DSC_8626.jpg

    DSC_8627.jpg


  •  Trim the sweater to the style that you want. On some I wrapped up and inch or so and then left the top of the sweater lose and sticking up.  On a couple of the white ones in the photo, I trimmed the top even with the jute. You can do it any way you want.  You can also shape it, squeeze to make it taller and skinnier or push down and flatten to make it more short and squat. 

  • How to make a sweater pumpkin!
    I hope you enjoy making your sweater pumpkins!