It's Wednesday and that means that it's time for the Wednesday Writer's Workshop by Mama Kat This weeks options were:
1.) What's ailing you? Diagnose yourself with a syndrome. (inspired by Kimberly from Kamp KK
2. Share with us something you made by hand. (inspired by Texan Mama via email)
3. Fess up. Tell us what you found after spying on someone.(inspired by The Scattered Mind of a Tattooed Mini Van Mom)
4. "How are y'all doing it? This summer, I mean? I cannot remember ever being as busy as we've been over the past two months. Those of you who are blogging daily, being as witty and entertaining as ever...I beg of you...HOW?" (inspired by Lula of Lulaville)
5. What are you afraid of? (inspired by Life with Kaishon)
I went with Topic #2!!!!
I've been playing around with bleach stenciling on t-shirts the last few weeks. If you have never bleach stenciled then you really should click on this link for my easy to follow instructions and join in on the fun.
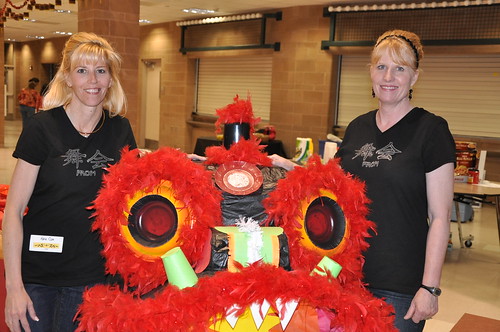
I made the cutest girl robot shirt for one of my daughters to wear and of course was in a hurry and didn't photograph it. Same with the turtle one I made for a friend's baby. It's the same technique that I used to make the after prom shirts for my friend Gina and I, shown below. We also made the dragon!!!

 I'm also working on a sweater that is pieces of 6 other sweaters all serged together. I'll post more about that later. For now I am having a blast playing with colored T-shirts, butcher paper and a spray bottle of bleach.
We are still in the midst of hell week and because I didn't have enough to do, I decided to make T-Shirts for my friend and I to wear while we serve food to all of the hordes of teenagers at After Prom. We both had been thinking about what fun costume we could wear to go along with the theme of Asian Nights. I have a gorgeous turquoise kimono that would have been perfect except for the fact that the long sleeves would catch fire in the ovens and would trail into the nacho cheese dip as we poured it into the nacho fountain. That left us with our regular clothes. A friend of mine, Amy, posted a link to a picture of some really cute shirts made by cutting out a stencil and then using bleach with it. I thought I would give it a try.
Here is how to Bleach Stencil a shirt.
Materials:
A cotton or a cotton blend shirt. I used a blend because I wanted the color change to be less dramatic.
A small spray bottle- The best are the small travel sprayers from Walmart which are 99 cents. The bottle must have a super fine spray.
Bleach
Butcher or Freezer Paper- I like Reynolds Brand
X-acto Knife to cut stencil
Computer printer
Find a picture that you would like to make a stencil of on your computer. You can either cut a piece of the butcher paper to an 8.5X11" sheet and print onto the non-shiny side or print it onto a regular piece of paper. If you have used plain paper, tape it on all 4 sides to the non-shiny side of a piece of freezer paper and place the freezer paper on top of a stack of newspapers for cutting. If you want to make more than one stencil, stack 2 sheets of butcher paper, taping then to each other so that they do not shift and then cut out both at the same time. 
With an X-acto knife, cut out the stencil along each of the lines. For letters like P or O, save the small center pieces to place on the shirt later to make the letters complete. 
Once the stencil is all cut out, take a iron set to the hottest temperature with NO steam. Carefully press the stencil onto the shirt making sure to get the edges well sealed. Add the centers to any letters and iron them on as well.

Once the stencil is ironed on, insert cardboard or a paper bag into the shirt to prevent the bleach from soaking through to the back of eh shirt.
Cover all parts of the T-Shirt except the stencil to prevent overspray from getting on any other parts of the shirt.

Take your spray bottle and add one part bleach and 2 parts water. For hard to dye shirts, like dark colors or poly blends a 1 to 1 ratio works better. The spray bottle has to have a very fine even mist when it sprays. Large drops will leave uneven bleaching. This bottle from Walmart has the best spray. 
Lightly spray evenly over the open parts of the stencil until the fabric is damp. I use a paper towel to blot up any extra spray from the paper stencil. Let the fabric dry. The lighter you spray, the better. If you get the fabric too wet, it will seep under the stencil and your lines will not be very crisp.  Repeat until the color inside the stencil is as light as you want. On a cotton shirt it will take anywhere from 2 to 6 spray sessions. On a cotton poly blend it can take up to 8 or 10 depending on how dark the shirt is. For my shirt, I set it outside in the bright sunshine while I sprayed and let dry. The sun slows down the bleaching in the exposed areas while the edges under the paper got much lighter. It really created a great look.
Note: as the bleach dries, it will leave a white residue that will make it look lighter than the fabric really is so make sure you do enough sprays to get it as light as you want your fabric.
Once the last bleach spray has dried, slowly peel off the paper stencil. It will still have the residue from the bleach on the fabric.

Rinse the shirt in very warm water being careful not to get the bleach on other parts of the shirt. add a bit of soap to the rinse water and then rinse completely. Toss into the washer with some old towels and run through a full cycle. The shirt can be dried on a line or in the dryer and is now ready to wear.
This is a very easy project. Have fun creating all kinds of fun shirts with this method.


 I'm also working on a sweater that is pieces of 6 other sweaters all serged together. I'll post more about that later. For now I am having a blast playing with colored T-shirts, butcher paper and a spray bottle of bleach.


